Season 4 of Gielinor Games introduced a free-agent format, where contestants competed individually rather than in fixed teams. While some main challenges placed players into temporary teams, eliminations and the finale were contested solo. The season’s prize pool began at 15 million GP donated by Soup and grew through viewer contributions to a total of 65 billion GP.
Each episode consisted of:
The three best-performing players in each challenge formed the Tribunal. Tribunal members were safe from elimination and voted for one player to enter the Banning. That player then selected their own opponent before the elimination challenge was revealed.
Winners of a Banning received the Amulet of Choice, which allowed them to either claim an additional 200 million GP in winnings, sabotage another player in the next challenge, or gain partial immunity from being chosen as a Banning opponent.
Two episodes featured double-elimination Bannings with three players competing: Top Gear (Episode 5) and Level Up (Episode 11). The season champion ultimately claimed 30 billion GP from the final prize pool.


Fetch item spawns from around the map. If a contestant returned with the same item as another contestant, or one that had been picked in a previous round, they were eliminated.
Watch Episode| # | Player | Result |
|---|---|---|
| 1 |
|
Won Round 8 |
| 1 |
|
Won Round 8 |
| 3 |
|
Won Round 8 |
| 4 |
|
Lost Round 8 |
| 5 |
|
Lost Round 7 |
| 5 |
|
Lost Round 7 |
| 5 |
|
Lost Round 7 |
| 5 |
|
Lost Round 7 |
| 9 |
|
Lost Round 6 |
| 10 |
|
Lost Round 5 |
| 10 |
|
Lost Round 5 |
| 12 |
|
Lost Round 4 |
| 12 |
|
Lost Round 4 |
| 14 |
|
Lost Round 3 |
| 14 |
|
Lost Round 3 |
| 16 |
|
Lost Round 2 |
| 17 |
|
Lost Round 1 |
| 17 |
|
Lost Round 1 |

Survive against final-phase Olm in the final room of the Chambers of Xeric for as long as possible.
Watch Episode| # | Player | Result |
|---|---|---|
| 1 |
|
Survived Longest |
| 2 |
|
Survived 2nd Longest |
| 3 |
|
Survived 3rd Longest |
| 4 |
|
Survived 4th Longest |
| 5 |
|
Survived 5th Longest |
| 6 |
|
Survived 6th Longest |
| 7 |
|
Survived 7th Longest |
| 8 |
|
Survived 8th Longest |
| 9 |
|
Survived 9th Longest |
| 10 |
|
Survived 10th Longest |
| 11 |
|
Survived 11th Longest |
| 12 |
|
Survived 12th Longest |
| 13 |
|
Survived 13th Longest |
| 14 |
|
Survived 14th Longest |
| 15 |
|
Survived 15th Longest |
| 16 |
|
Survived 16th Longest |
| 17 |
|
Survived Least |

Contestants were split into two teams to make as much money as possible in 30 minutes. Every member of the teams had to be using a unique money making method, and all contestants started with 100k GP starting cash and a ring of wealth.
Watch Episode| # | Player | Result | Team |
|---|---|---|---|
| 1 |
|
589,743 (6,508,951) | Team B |
| 1 |
|
925,603 (6,508,951) | Team B |
| 1 |
|
910,719 (6,508,951) | Team B |
| 1 |
|
1,728,292 (6,508,951) | Team B |
| 1 |
|
504,078 (6,508,951) | Team B |
| 1 |
|
842,172 (6,508,951) | Team B |
| 1 |
|
149,595 (6,508,951) | Team B |
| 1 |
|
833,519 (6,508,951) | Team B |
| 2 |
|
471,909 (4,160,862) | Team A |
| 2 |
|
601,995 (4,160,862) | Team A |
| 2 |
|
444,131 (4,160,862) | Team A |
| 2 |
|
706,670 (4,160,862) | Team A |
| 2 |
|
323,303 (4,160,862) | Team A |
| 2 |
|
992,780 (4,160,862) | Team A |
| 2 |
|
376,826 (4,160,862) | Team A |
| 2 |
|
243,248 (4,160,862) | Team A |

| # | Player | Result | Team |
|---|---|---|---|
| 1 |
|
35 (145) | Tribunal |
| 1 |
|
54 (145) | Tribunal |
| 1 |
|
53 (145) | Tribunal |
| 2 |
|
45 (144) | Stupid Morons |
| 2 |
|
49 (144) | Stupid Morons |
| 2 |
|
50 (144) | Stupid Morons |
| 3 |
|
39 (141) | Mammals Waxed Hair |
| 3 |
|
48 (141) | Mammals Waxed Hair |
| 3 |
|
54 (141) | Mammals Waxed Hair |
| 4 |
|
37 (99) | B0aty |
| 4 |
|
37 (99) | B0aty |
| 4 |
|
25 (99) | B0aty |
| 5 |
|
25 (86) | Surströmming |
| 5 |
|
27 (86) | Surströmming |
| 5 |
|
34 (86) | Surströmming |

Contestants had to gear up their accounts as much as possible in 30 minutes. All stat bonuses, positive and negative, would then be added up and the three contestants with the highest total score would become the tribunal.
Watch Episode| # | Player | Result |
|---|---|---|
| 1 |
|
766.8 |
| 2 |
|
764.2 |
| 3 |
|
718 |
| 4 |
|
699 |
| 5 |
|
692.8 |
| 6 |
|
582 |
| 7 |
|
580 |
| 8 |
|
578.2 |
| 9 |
|
536.2 |
| 10 |
|
509.2 |
| 11 |
|
503.8 |
| 12 |
|
502.8 |
| 13 |
|
486 |
| 14 |
|
316.4 |

A relay race from Mount Quidamortem to the entrance to Prifddinas using only red clicks.
Watch Episode| # | Player | Result | Team |
|---|---|---|---|
| 1 |
|
6:32 (11:27) | C Engineer/Faux |
| 1 |
|
4:55 (11:27) | C Engineer/Faux |
| 2 |
|
5:36 (11:38) | Mr Mammal/Torvesta |
| 2 |
|
6:02 (11:38) | Mr Mammal/Torvesta |
| 3 |
|
6:56 (11:44) | Framed/Settled |
| 3 |
|
4:48 (11:44) | Framed/Settled |
| 5 |
|
6:44 (12:15) | Roidie/Zoepancakes |
| 5 |
|
5:31 (12:15) | Roidie/Zoepancakes |
| 6 |
|
5:17 (12:40) | V the Victim/Solo Mission |
| 6 |
|
7:23 (12:40) | V the Victim/Solo Mission |
| 7 |
|
8:06 (14:25) | Hooti/B0aty |
| 7 |
|
6:19 (14:25) | Hooti/B0aty |

Find and equip an item in the equipment slot that Soup called out each round, with the last to return being eliminated.
Watch Episode| # | Player | Result |
|---|---|---|
| 1 |
|
Won Round 8 |
| 1 |
|
Won Round 8 |
| 1 |
|
Won Round 8 |
| 4 |
|
Lost Round 8 |
| 5 |
|
Lost Round 7 |
| 6 |
|
Lost Round 6 |
| 7 |
|
Lost Round 5 |
| 8 |
|
Lost Round 4 |
| 9 |
|
Lost Round 3 |
| 10 |
|
Lost Round 2 |
| 11 |
|
Lost Round 1 |

Contestants were divided into two teams that would then have to divide up five different classic PKing setups. The teams would each choose one player to fight first, with the winning player then facing the other team's next player with whatever remaining supplies they had.
Watch Episode| # | Player | Result | Team |
|---|---|---|---|
| 1 |
|
5 | Blue |
| 1 |
|
5 | Blue |
| 1 |
|
5 | Blue |
| 1 |
|
5 | Blue |
| 1 |
|
5 | Blue |
| 2 |
|
3 | Red |
| 2 |
|
3 | Red |
| 2 |
|
3 | Red |
| 2 |
|
3 | Red |
| 2 |
|
3 | Red |

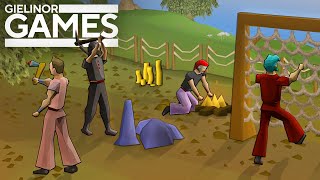
Contestants had 3 minutes to choose an item (prop) to hide as in a given area.
Watch Episode| # | Player | Result |
|---|---|---|
| 1 |
|
18 |
| 2 |
|
15 |
| 3 |
|
12 |
| 4 |
|
12 |
| 5 |
|
9 |
| 6 |
|
8 |
| 7 |
|
7 |
| 8 |
|
5 |
| 9 |
|
5 |

| # | Player | Result |
|---|---|---|
| 1 |
|
Won Final Round |
| 2 |
|
Lost Final Round |
| 3 |
|
Lost Final Round |
| 4 |
|
Lost Final Round |
| 5 |
|
Lost Heat 1 |
| 5 |
|
Lost Heat 2 |
| 6 |
|
Lost Heat 1 |
| 6 |
|
Lost Heat 2 |
| # | Player | Result |
|---|---|---|
| 1 |
|
42:57 |
| 2 |
|
45:01 |
| 3 |
|
55:01 |
| 4 |
|
55:31 |
| 5 |
|
56:58 |
| 6 |
|
20 Skills (DNF) |
| 6 |
|
20 Skills (DNF) |

Contestants were put through a gauntlet of mini challenges. The contestants would get points for their placements in each challenge, and the contestant with the highest total score at the end would win the season.
Watch Episode| # | Player | Result |
|---|---|---|
| 1 |
|
27 |
| 2 |
|
26 |
| 3 |
|
13 |
| 4 |
|
12 |
| 4 |
|
12 |